Wednesday, 29 February 2012

Manicure Tutorial - how I do it - start to finish

I've had several requests to show how I do my manicures . . . so here we go. Apologies as this is very picture heavy.

Firstly I remove any old polish. I use OPI Expert Touch polish remover and find it's not too drying for my cuticles. Next I use a lint free cloth (also OPI Expert Touch) to finally remove any residual polish around my cuticles. These are my everyday tools. Nothing fancy just a 4-way buffer, an orange stick and some clippers.


This is a new addition to my essential tools - a buffing orange stick - what a brilliant idea! Next I use Sally Hansen's Instant Cuticle Remover which I leave on for about a minute, then scrape around my cuticles and push them back. After rinsing this off I go back to my buffing orange stick and clean up around my cuticles.


Next is trimming and shaping. I just use my 4-way buffer for this. OPI Natural Nail Base Coat is my go-to base coat. It applies easily and dries almost instantly. The one downside is that the lid often parts way with the brush (mental note to self to super glue it back on before I use the entire bottle!)


Now the fun part - choosing a polish! Today I've selected OPI Dutch 'Ya Just Love OPI and this is my first time using it. Picture #3 shows the first coat, which is actually pretty streaky.


On to the clean up stage - I ALWAYS do this as I go. My go-to tools for this are a small paint brush and my orange stick. Any polish I get on my cuticles I remove instantly with an orange stick dipped in some polish remover. This polish pump is by far the best investment I've made. It's easy to use one handed and dispenses only a tiny amount of polish remover at one time. My little finger shows a small amount of polish on my cuticles which isn't a major - but the perfectionist in me has to clean it up!


So now we apply the second coat and clean that up also. I just dip my paint brush in polish remover and sweep it around the tops of my cuticles making sure that I wipe of any accumulated polish on a paper towel. If you don't wipe it off then your job becomes twice as messy as it spreads all around the cuticle! I don't have any tips for painting my right hand (I am right handed) other than practise! The two middle pictures show my right hand first coat and second coat and clean up. I always topcoat with Essie Good to Go - even if I'm going to stamp straight away. Adding a topcoat means that I can get on with whatever I'm doing (within reason!) without chipping. I highly recommend this topcoat. I can unload the dishwasher 5 minutes after applying it without any major damage. It also means I can polish my nails right before bed and don't end up with a sheet impression. Also if I topcoat before stamping and the stamping doesn't work out, I can gently remove the stamping and my manicure underneath is almost intact.


On to the photographing stage - this is my photo in it's original untouched form. I usually try and find a sunny spot although these days the sun is a bit scarce.


And the finished result . . . I've rotated the picture a bit and added my watermark.


I know everyone has their own way of painting their nails, but this is my usual method. I hope you've found this informative and it answers a few questions.

Sunday, 26 February 2012

OPI Wooden Shoe Like to Know

Today's polish is Wooden Shoe Like to Know (gotta love OPI for great names!) from the Holland collection. This has definitely moved to one of my favourite polishes.

Wooden Shoe Like to Know is a medium warm brown with tons of gold shimmer which give it a bronze undertone. What more could you want?! lol I love OPI brushes and find they make application a breeze. This is two coats, topped with Essie Good to Go.


Saturday, 25 February 2012

Essie Foot Loose with stamping

I just can't go past a vibrant purple/pink and Essie's Foot Loose definitely checks that box! Foot Loose is a gorgeous blue based creme. I struggled a bit with the brush with this polish - it is tiny! I guess that could just be in comparision to an OPI brush which huge in my opinion. The formula is gel like and opaque in two coats - well nearly one actually. I have to do two coats for good measure - it doesn't seem right to do just one!

I didn't get a photo of it on it's own, but this is my favourite way to stamp - a metallic polish stamped over a creme base.

Anyway here's how I wore it . . .

Base colour: Essie Foot Loose
Nail plate: QA 16
Stamp colour: China Glaze Harmony
Topped with Essie Good to Go


Monday, 20 February 2012

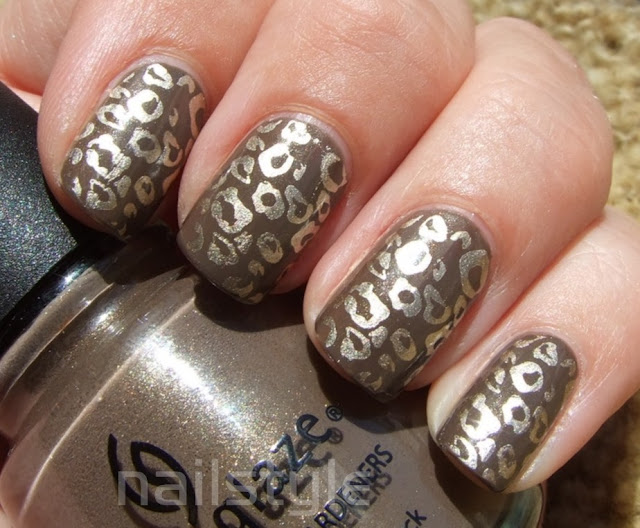
China Glaze Ingrid with stamping

Ingrid is probably my all time favourite polish. I just love it's gorgeous golden shimmer amidst a warm taupe. Please excuse the poor condition of my cuticles - this is what happens when you go camping and neglect your hands!

Base colour: China Glaze Ingrid
Nail plate: Konad M57
Stamp colour: China Glaze 2030
Topped with Essie Good to Go


Thursday, 16 February 2012

China Glaze Life Preserver with stamping

How I do love a dusty orange! China Glaze Life Preserver is from the Anchors Away collection. It is a muted burnt orange creme - perfect for summer! This shows two coats but I think 3 would probably have been better. The formula is thick but easy to apply and dries quickly.

Base colour: China Glaze Life Preserver
Nail plate: QA16
Stamp colour: China Glaze 2030
Topped with Seche Vite


Wednesday, 15 February 2012

Essie Limited Addiction with new stamping plate

Todays polish is a gorgeous, racy, garnet red creme from Essie called Limited Addition. It's an amazing formula that goes on like butter and is opaque in two coats.

Base colour: Essie Limited Addition
Nail plate: QA16
Stamp colour: China Glaze Hi-Tek
Topped with Essie Good to Go


I've been dying to try out these new plates I got from Ebay - this one is called QA16 and I bought it from samuelwsk333. I'm unsure who makes them but they do sell individually.


Monday, 6 February 2012

Butter London - All Hail the Queen - with stamping

This manicure turned out to be a lot more subtle than I planned. Coupled with the fact that I was in a hurry and added a topcoat to help dry All Hail the Queen which I think detracted a lot from its holographic finish. Then I decided to mattify it and well lets just say that I ended up taking this lot off pretty quickly! Anyway here's my failed attempt to show you . . .


Base colour: Butter London All Hail the Queen
Nail plate: Konad M65
Stamp colour: China Glaze Robotika
Topped with Essie Good to Go, then Essie Matte about You

Sunday, 5 February 2012

Essie Poppie Cock with stamping

Todays polish is Essie's Poppie Cock which is a warm chestnut colour which I love. Although I don't love the formula. This is unlike any Essie polish I have is a very thin jelly like consistency. It also has a pretty strong toxic smell. That said, it does dry very quickly and has a nice shiny finish. This shows three coats.


Base colour: Essie Poppie Cock
Nail plate: Konad MS6
Stamp colour: China Glaze Hi-Tek
Topped with Essie Good to Go


Wednesday, 1 February 2012

Cult Nails - Devious Nature with stamping

Well it's been a long time since I've posted as we've been enjoying our summer holidays - even though they've been wet and windy! Still back to reality now, so hopefully a bit more time for some regular posts.

This is the first time I've tried Cult Nails Devious Nature and it doesn't disappoint. This gorgeous blue based creme goes on beautifully and is opaque in two coats.

Base colour: Cult Nails Devious Nature
Nail plate: Konad M63
Stamp colour: China Glaze Millennium
Topped with Essie Good to Go

Inside natural light
In direct sunlight


Related Posts Plugin for WordPress, Blogger...